A DIY Guide to Installing Solar Panels at Home
Solar energy has emerged as one of the most viable alternatives to traditional energy sources. With advancements in technology, installing solar panels at home has become more accessible than ever before. This guide aims to provide a comprehensive overview of the steps involved in a DIY solar panel installation, the necessary equipment, and the benefits it can bring to your household.
Understanding Solar Energy
Before diving into the installation process, it’s essential to understand what solar energy is and how solar panels work. Solar panels convert sunlight into electricity through photovoltaic (PV) cells. These panels absorb sunlight, generate direct current (DC) electricity, and then convert it into alternating current (AC) electricity, which powers your home.
Benefits of Solar Energy
Investing in solar panels provides numerous advantages:
- Reduction in Energy Bills: By generating your electricity, you can significantly lower or even eliminate your monthly utility bills.
- Environmental Impact: Solar energy is renewable and reduces greenhouse gas emissions, making it an eco-friendly choice.
- Increased Property Value: Homes with solar energy systems are often more appealing to buyers, which can increase property value.
- Energy Independence: Solar power allows you to produce your energy, reducing dependence on the grid and protecting against rising energy costs.
Planning Your Solar Panel Installation
Proper planning is crucial for a successful solar panel installation. Start by evaluating your energy needs and determining how many panels you will require. This assessment includes analyzing your current energy consumption and considering future growth in needs.
Calculating Energy Needs
To gauge your energy requirements:
- Review past utility bills to determine monthly and yearly consumption in kilowatt-hours (kWh).
- Consider any upcoming changes such as new appliances or changes in family size that could affect your energy usage.
Choosing the Right Solar Panels
When selecting solar panels, look for factors such as efficiency, warranty, and price. Generally, there are two types of solar panels: monocrystalline and polycrystalline. Monocrystalline panels are typically more efficient and space-effective but tend to come at a higher cost. Conversely, polycrystalline panels are more affordable but may require more space and may have slightly lower efficiency.
Understanding Local Regulations and Incentives
Before proceeding with your installation, familiarize yourself with local regulations and permits required for solar panel installation. Each state or municipality may have different requirements, and you may need to apply for permits or inspections. Additionally, explore state and federal incentives for solar energy, like tax credits or rebates, which can reduce the overall cost.
Gathering Necessary Equipment
Once you have a clear plan, gather all the essential tools and equipment for your installation:
- Solar panels
- Inverter
- Mounting hardware (rails, brackets, and screws)
- Batteries (optional, for energy storage)
- Electrical wiring
- Safety gear (gloves, goggles, hard hat)
- Tools (drill, screwdriver, wrench, multimeter, etc.)
Preparing Your Roof
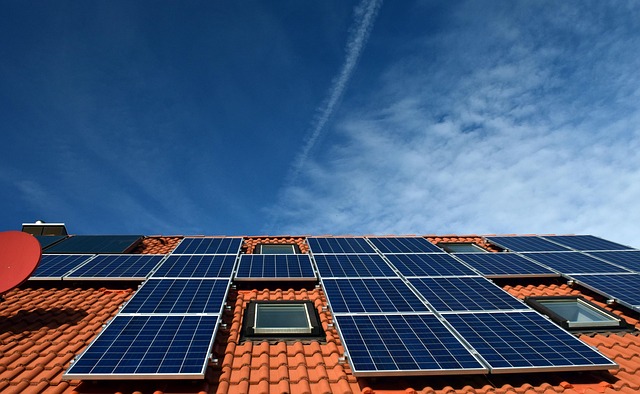
Before you install your solar panels, ensure that your roof is suitable for solar installation. This includes ensuring that the roof is:
- In good condition and can support the weight of the panels
- Free of shading from nearby trees or buildings, as this can significantly reduce efficiency
- At an appropriate angle to maximize sunlight exposure
Installing the Solar Panels
Once everything is prepared, you can begin the installation process. Here’s a step-by-step overview:
1. Mounting the Panels
Start by securing the mounting hardware on the roof. The mounts must be installed into the rafters for stability. Make sure to follow the manufacturer’s specifications for spacing and orientation.
2. Connecting the Panels
Once the mounts are in place, install the solar panels onto the mounted hardware. Ensure they are securely fastened. Connect the panels in series or parallel, depending on your system design, using the appropriate electrical wiring. Follow the wiring diagram provided with the panels for proper connection.
3. Installing the Inverter
The inverter is crucial as it converts DC electricity into AC electricity. Mount your inverter in a cool, shaded location near the main electrical panel. Use electrical conduits to safely route the wiring from the solar panels to the inverter and then to the electrical panel.
4. Electrical Connections
Once the inverter is installed, connect it to your home’s electrical panel. This step may require a licensed electrician, especially if local codes mandate fees and inspections. Ensure all electrical connections are secure and safe to avoid hazards.
5. Testing Your System
After connecting everything, conduct a thorough test of your system. Use a multimeter to check the voltage and ensure the inverter is functioning correctly. Once confirmed, you can turn on the system and monitor the energy production.
Maintaining Your Solar Panel System
After installation, maintaining your solar panel system is vital for long-term performance:
- Regularly check for dirt, debris, or snow on the panels that may affect performance.
- Inspect electrical connections periodically for wear or corrosion.
- Consider professional maintenance every few years to ensure optimal functioning.
Final Thoughts
Installing solar panels at home can be a rewarding endeavor that contributes not only to your energy independence but also to environmental sustainability. While the process may seem daunting, with the right preparation, tools, and knowledge, you can successfully harness the power of the sun. Each step, from planning and choosing the right equipment to installation and maintenance, plays a crucial role in ensuring that your solar energy system meets your needs and lasts for years to come.
As you embark on your solar journey, remember to stay informed of advancements in solar technology and potential policy changes that may affect your installation. Solar energy is not just a trend; it’s a step toward a sustainable future.


